My Personal Bead Challenge 2011:
Okay so here is an idea I'm copying from that movie called Julia and Julia or whatever that one about the chef was called. I decided I was going to go through Corina Tettinger's book, "Passing The Flame" 3rd edition, and do something from each chapter. This will give me a good review of things I already know but can always improve on and also force me to try some of the things I have skipped over, didn't like, or was too intimidated to give a try. I hope to do something out of her book once each week but if I get a few more in or a few less I'm not gonna stress about it. So up first is "The Basic Bead." She shows 3 ways of how to make a basic bead. This is obviously something I do every time I make a bead but figured I would give all 3 ways a go and see if I like something better than what I learned at the Toledo Museum of Art Glass Pavilion - which is an awesome place to go for lessons and watch some wonderful and talented glass artists!
From left to right: 1. The Winding Method, 2. The Disk Method (the way I learned,) 3. The Fast and Furious Blob Method (two beads done this way.)
I actually liked the Winding Method and I think I will use this quite a bit as it is a bit faster for me and can produce a rounder (less doughnut shape) bead which I am finding I prefer as my decorations get more detailed. The Fast and Furious Method produced the roundest bead but I have to admit I struggled to get clean bead hole ends as the footprint is very large when you use this method. I may have some good uses for this though and will keep an open mind.
Now for a few Silvered glass experiments.
I had limited success today with silvered frit - frit can often give me fits:
I am showing two photos of the same 4 beads b/c each side offers a different view of the colors. From left to right: The first bead has a base of yellow opal 591266, then a blob of yellow opal rolled in Psyche frit applied, reduced, and then encased. The purples, pinks and blues are just starting to come up. I need to work on this combo some more!! The second bead has a black base which I wrapped in a Psyche/Yellow Opal stringer then reduced before and after I placed the dots of clear. This bead looks pretty cool with the lines but no silver reaction colors came up at all so it's not what I was going for. The third bead is more like it! It has a base of copper green, wrapped in a 24K/Psyche stringer, reduced before and after laying squiggly clear dots and lines. I reduced this bead a lot!!!! So maybe that is a key for this Psyche silvered glass - hmmm.... I'll try it again soon! Then the last bead also has a copper green base with a blob of copper green rolled in Psyche frit applied with reduction before and after clear dots. This bead has potential.
Here is a photo of the same beads in direct sunlight - it shows some of the colors a little better:
Now for the beads I really liked today:
The green in this bead is CIM Sherwood and the pink is Veiled RO with my secret glass on top to create my secret pink blend! I will be making more of this combo for all my pink/green customers!
Next two:
These two are Sherwood and non veiled RO and they do not have my secret glass mix. I am just using standard clear where needed in these. I also am not too happy with the way the Sherwood went kind of milky with this application.
4th bead in the series:
I know this bead looks a lot like the first one in this series but it's not. Instead of Sherwood it's made with CIM Celedon and it also has my secret pink formula. It's a very cool bead but I prefer the Sherwood combo personally.
5th bead:
This bead is the same combo as the 4th bead but w/out my secret pink formula.
Next set of beads in the series:
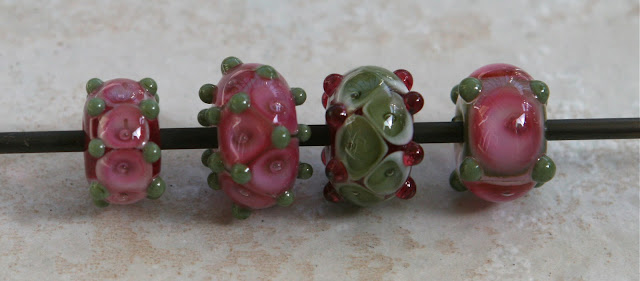
These beads are all made with non-veiled RO (no secret formula applied) and CIM Olive. I am very happy with the first, second and fourth beads in this photo. I am not particularly happy with the way the green went milky in the 3rd bead. The second bead in this photo deserves some close ups all of it's own. It's one of my favorites from today's work for sure:
The next bead is a single bead of a color combo I wanted to retry from a prior day. It is CIM Sherwood and lt. Sky Blue. I kind of like it:
The next photo shows the beads I made with CIM Sherwood, that mystery blue in my stash - I think it's CIM French Blue, and lt. Sky Blue:
I prefer the combo of the French Blue and Sherwood w/out the lt. sky accents.
I'm totally in love with this bead:
These are similar to my Commando beads but they are made with CIM Sherwood, light Ivory and Black. Clean and simple!
What a first day of 2011 I had! Can't wait to do it again soon!


No comments:
Post a Comment